In the realm of web development, integrating weather data can greatly enhance the user experience of a wide range of applications, from travel and tourism websites to agricultural platforms.
This article provides a comprehensive guide for developers on how to integrate weather APIs into web applications using JavaScript, with a focus on practical implementation and best practices.
We'll use Tomorrow.io's Weather API as a case study to illustrate these concepts.
Read: Top 10 Best Javascript Frameworks
Understanding Weather APIs
Before diving into the integration process, it's crucial to understand what weather APIs offer.
These APIs typically provide various meteorological data such as temperature, humidity, wind speed, forecasts, and historical weather information.
The choice of API depends on the specific needs of your application, the level of detail required, and the geographical coverage.
Read: Structural Design Patterns in Java

Selecting the Right Weather API
There are numerous weather APIs available, each with its own set of features and pricing plans. For our case study, we'll consider Tomorrow.io's Weather API, known for its comprehensive data and accuracy. When selecting an API, consider the following factors:
-
Data granularity and update frequency
-
Geographical coverage
-
Reliability and accuracy
-
Cost and usage limits
-
Documentation and developer support
Step-by-Step Integration with JavaScript

Step 1: API Key Registration
Before integrating any weather API, you must first register with the API provider to obtain an API key. This key is a unique identifier that allows the API service to authenticate your requests.
-
Sign Up: Visit the weather API provider’s website (for instance, the website of the weather API you choose to use).
-
Create an Account: Provide the necessary details to create an account.
-
Get API Key: Once your account is set up, navigate to a section typically labeled as “API” or “Developers” to access your API key.
Read: What are Collections in Java and API Algorithms?
Step 2: Understanding the API Documentation
API documentation is your handbook. It provides detailed information about:
-
Endpoints: URLs through which you access the weather data.
-
Parameters: Options you can set to customize data, such as location, time range, type of weather data, etc.
-
Response Format: Understanding how the data is structured in the response.
-
Error Codes: Information on how the API communicates issues or failures.
Read: 10 Hard Skills Every Java Developer Should Have
Step 3: Making API Requests with JavaScript
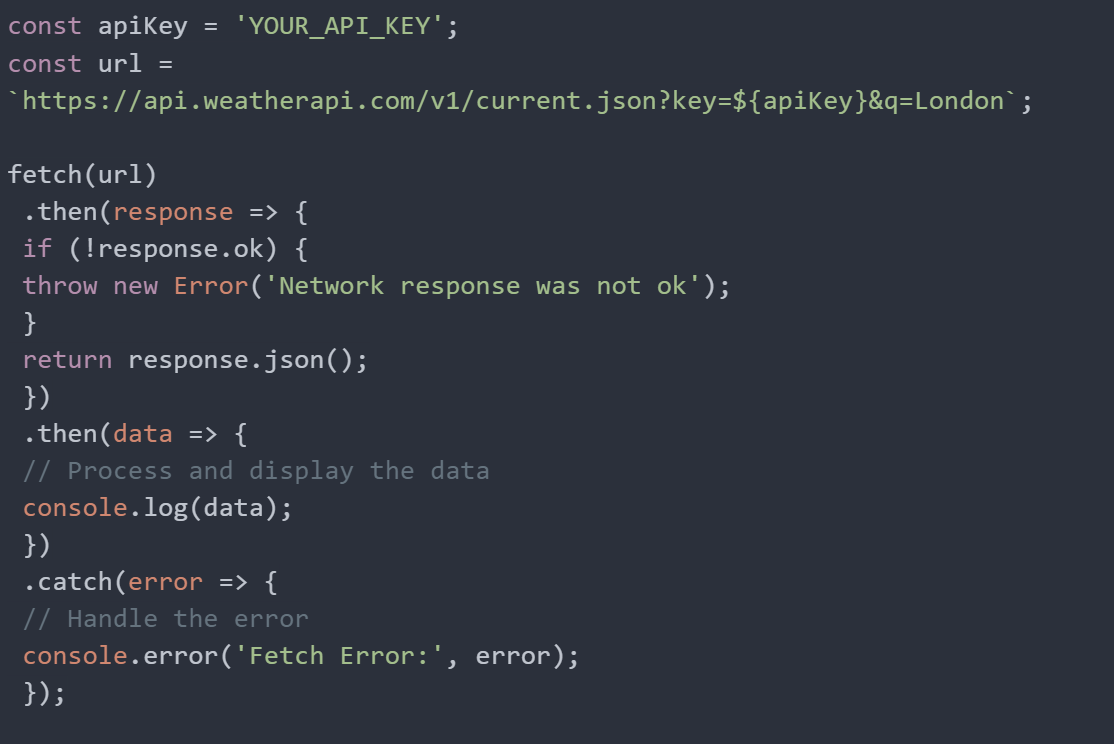
JavaScript offers various methods to make HTTP requests. The fetch API is a common choice due to its simplicity and power.
Example Code Snippet
javascript

Replace 'YOUR_API_KEY' with your actual key and adjust the URL and parameters as per your requirement.
Step 4: Handling the Response
Upon receiving a response from the API, you need to parse it and implement logic to display the data:
-
Parsing JSON: Convert the response to a JavaScript object for easy manipulation.
-
Data Extraction: Extract specific information like temperature, humidity, or weather conditions from the response.
-
UI Update: Update your web page’s DOM to display this information.
Read: Data-Oriented Programming in Java
Step 5: Error Handling
Robust error handling is crucial:
-
Network Errors: Handle errors related to network issues or incorrect API endpoint calls.
-
API Limit Errors: Handle errors related to exceeding API usage limits.
-
Data Validation: Validate the data to ensure it’s in the expected format.
Step 6: Caching Responses
Caching is an optimization technique:
-
Reduce API Calls: Store responses to reduce the number of API calls, thereby saving bandwidth and reducing load on the server.
-
Local Storage: Use local storage or session storage in browsers for caching.
Cache Expiry: Implement logic to refresh cached data after a certain period.

Best Practices For Integrating Weather APIs with JavaScript
-
Respect API Limits: Adhere to the API's rate limits to avoid service interruptions.
-
Secure Your API Key: Keep your API key confidential to prevent unauthorized usage.
-
Responsive UI: Design a user interface that gracefully handles and displays weather data.
-
Accessibility: Ensure that weather information is accessible to all users, including those with disabilities.
-
Regular Updates: Stay updated with changes to the API, such as new features or deprecations.
Read: Top 15 Machine Learning Libraries and Tools for Java
Conclusion
Integrating a weather API with JavaScript can significantly enhance your web application's functionality.
By following the steps outlined in this guide and adhering to best practices, developers can effectively utilize weather data to improve user experience and engagement.
Whether you choose Tomorrow.io's Weather API or another provider, the key lies in understanding the API's capabilities and integrating it seamlessly into your application's design and functionality.

